Configuring the IB-03x0 for IP Cameras
Next step after being able to connect to your blox device over ssh or VNC on your local LAN, it setting up a DHCP server for the IB-03x0. The following steps will show how to install and configure the isc-dhcp-server on your device.
Prerequisites
At least one IP camera (PoE preferred but optional) to be able to test the configuration.
Remark
To be able to use PoE on the IB-03x0, the Blox need to be powered with 48V. The standard power supply shipped with any Blox device is 48V. Just in case you want to use a custom power supply.
DHCP Configuration
The IB-03x0 has 4 Ethernet ports. Each of them will be assigned a fixed IP address on a different subnet and a DHCP range between 100 and 200.
Overview of the configuration
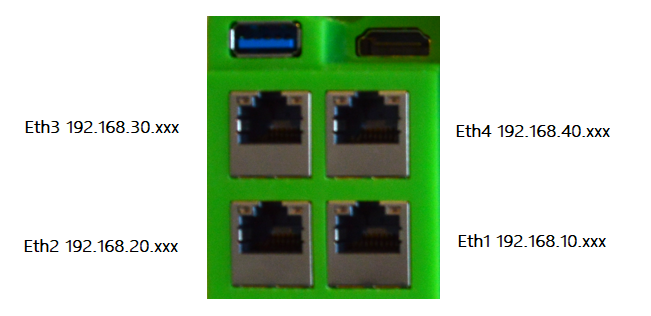
- Ethernet port 1 (eth1):
- fixed IP address: 192.168.10.1
- DHCP range active between 192.168.10.100 to 192.168.10.200
- Ethernet port 2 (eth2):
- fixed IP address: 192.168.20.1
- DHCP range active between 192.168.20.100 to 192.168.20.200
- Ethernet port 3 (eth3):
- fixed IP address: 192.168.30.1
- DHCP range active between 192.168.30.100 to 192.168.30.200
- Ethernet port 4 (eth4):
- fixed IP address: 192.168.40.1
- DHCP range active between 192.168.40.100 to 192.168.40.200
Step 1: Install the DHCP server
Before installing the DHCP server, you will need to be logged in on to your blox over ssh or VNC as described in the previous step.
Within the Terminal, install the isc-dhcp-server server with the command below.
$ sudo apt install isc-dhcp-server
Step 2: Install nano
In the following steps, some files need to be edited from the terminal and nano is a convenient way to do this. If you prefer to use vim, this is already pre-installed.
$ sudo apt install nano
Step 3: Set fix IP-address for the Ethernet ports
To set the fixed IP-adress for each ethernet
$sudo nano /etc/network/interfaces
The file will open in the terminal, add following configuration to it.
auto eth1
iface eth1 inet static
   address 192.168.10.1
   netmask 255.255.255.0

auto eth2
iface eth2 inet static
   address 192.168.20.1
   netmask 255.255.255.0

auto eth3
iface eth3 inet static
   address 192.168.30.1
   netmask 255.255.255.0

auto eth4
iface eth4 inet static
   address 192.168.40.1
   netmask 255.255.255.0
Once done, Ctrl+X followed by Y to save the file.
Step 4: Setup the dhcpd.conf
In the dhcpd.conf file, the options for domain name can be placed in comments and a basic subnet declaration will be added.
First open the dhcpd.conf file with nano
$ sudo nano /etc/dhcp/dhcpd.conf
Scroll the cusror down with the arrow key of your keyboard until option definitions common to all supported networks.... The two options below this line can be placed in comments by adding a # at the start of each line as shown below.
# option definitions common to all supported networks...
# option domain-name "example.org";
# option domain-name-servers ns1.example.org, ns2.example.org;
Now scroll down to the end of the file and add follow subnet declaration
# This is a very basic subnet declaration.

subnet 192.168.10.0 netmask 255.255.255.0 {
  range 192.168.10.100 192.168.10.100;
  option routers 192.168.10.1;
}

subnet 192.168.20.0 netmask 255.255.255.0 {
  range 192.168.20.100 192.168.20.100;
  option routers 192.168.20.1;
}

subnet 192.168.30.0 netmask 255.255.255.0 {
  range 192.168.30.100 192.168.30.100;
  option routers 192.168.30.1;
}

subnet 192.168.40.0 netmask 255.255.255.0 {
  range 192.168.40.100 192.168.40.100;
  option routers 192.168.40.1;
}
Now use, Ctrl+X followed by Y to save the file.
Step 4: Add interfaces
Now the interfaces that will be used for DHCP need to be configured.
FIrst open the /etc/default/isc-dhcp-server file with nano
$ sudo nano /etc/default/isc-dhcp-server
Now add the ethernet interfaces "eth1 eth2 eth3 eth4" to the file
# add eth1, eth2, eth3 and eth4 to INTERFACESv4
INTERFACESv4="eth1 eth2 eth3 eth4"
Now use, Ctrl+X followed by Y to save the file.
Step 5: Enable dhcp server
Now the DHCP server is configured, it can be enabled to automatically start at next boot of the Blox.
$ sudo systemctl enable isc-dhcp-server
Now we will need to restart the Blox.
$ sudo reboot now
Your ssh connection will be lost.
During the reboot you can connect an IP camera to one of the IB-03x0 ports.
Step 6: Testing the DHCP server
When the Blox is restarted, you can login again over ssh with the know IP address of the Blox on your network.
$ ssh ai-blox@xxx.xxx.xxx.xxx
When logged in, first check if the DHCP server is running.
$ sudo systemctl status isc-dhcp-server
The output will indicate that the DHCP server is running.
If you already have connected an IP camera to one of the ports, it will have received an IP address and will show in the output.
Below is an example of the output of the status request. Which indicates there is an IP lease for a camera connected to port 3.
● isc-dhcp-server.service - ISC DHCP IPv4 server
   Loaded: loaded (/lib/systemd/system/isc-dhcp-server.service; enabled; vendor preset: enabled)
   Active: active (running) since Thu 2023-04-13 07:03:27 UTC; 2h 23min ago
     Docs: man:dhcpd(8)
 Main PID: 10014 (dhcpd)
    Tasks: 1 (limit: 4915)
   CGroup: /system.slice/isc-dhcp-server.service
           └─10014 dhcpd -user dhcpd -group dhcpd -f -4 -pf /run/dhcp-server/dhcpd.pid -cf /etc/dhcp/dhcpd.conf eth1 eth2 eth3 eth4

Apr 13 09:20:03 tegra-ubuntu dhcpd[10014]: DHCPREQUEST for 192.168.30.101 from 00:62:6e:ef:b2:76 via eth3
Apr 13 09:20:03 tegra-ubuntu dhcpd[10014]: DHCPACK on 192.168.30.101 to 00:62:6e:ef:b2:76 via eth3
Apr 13 09:25:02 tegra-ubuntu dhcpd[10014]: DHCPREQUEST for 192.168.30.101 from 00:62:6e:ef:b2:76 via eth3
Apr 13 09:25:02 tegra-ubuntu dhcpd[10014]: DHCPACK on 192.168.30.101 to 00:62:6e:ef:b2:76 via eth3
Apr 13 09:26:08 tegra-ubuntu dhcpd[10014]: reuse_lease: lease age 66 (secs) under 25% threshold, reply with unaltered, existing lease for 192.168.30.101
Apr 13 09:26:08 tegra-ubuntu dhcpd[10014]: DHCPDISCOVER from 00:62:6e:ef:b2:76 via eth3
Apr 13 09:26:09 tegra-ubuntu dhcpd[10014]: DHCPOFFER on 192.168.30.101 to 00:62:6e:ef:b2:76 via eth3
Apr 13 09:26:09 tegra-ubuntu dhcpd[10014]: reuse_lease: lease age 67 (secs) under 25% threshold, reply with unaltered, existing lease for 192.168.30.101
Apr 13 09:26:09 tegra-ubuntu dhcpd[10014]: DHCPREQUEST for 192.168.30.101 (192.168.30.1) from 00:62:6e:ef:b2:76 via eth3
Apr 13 09:26:09 tegra-ubuntu dhcpd[10014]: DHCPACK on 192.168.30.101 to 00:62:6e:ef:b2:76 via eth3
You can also check the IP leases that have been used in /var/lib/dhcp/dhcpd.leases
$ more /var/lib/dhcp/dhcpd.leases
Below is an example of a lease.
lease 192.168.20.100 {
  starts 4 2023/04/13 09:39:12;
  ends 4 2023/04/13 09:49:12;
  cltt 4 2023/04/13 09:39:12;
  binding state active;
  next binding state free;
  rewind binding state free;
  hardware ethernet 00:62:6e:ef:b2:76;
  uid "\001\000bn\357\262v";
  set vendor-class-identifier = " \"\"";
}
Now you can ping the IP Camera with the IP address from the output of the status request.
$ ping xxx.xxx.xxx.xxx
Example of a successful ping connected to eth2 port on the IB-03x0.
$ ping 192.168.20.100
PING 192.168.20.100 (192.168.20.100) 56(84) bytes of data.
64 bytes from 192.168.20.100: icmp_seq=1 ttl=64 time=0.964 ms
64 bytes from 192.168.20.100: icmp_seq=2 ttl=64 time=0.770 ms
64 bytes from 192.168.20.100: icmp_seq=3 ttl=64 time=0.820 ms
64 bytes from 192.168.20.100: icmp_seq=4 ttl=64 time=0.752 ms
Extra: Port forwarding to access your camera directly
To access your camera directly over the network, port forwarding will need to be configured. The Ethernet port connected to your network is eth0. On this interface port 388 in the example below will be used to forward to your the camera IP address on port 88.
$ sudo -s
$ echo 1 > /proc/sys/net/ipv4/ip_forward
$ exit
$ sudo iptables -t nat -A POSTROUTING -o eth0 -j MASQUERADE
$ sudo iptables -t nat -A PREROUTING -i eth0 -p tcp -d 192.168.1.41 --dport 388 -j DNAT --to-destination 192.168.10.102:88